Showing posts with label tutorial. Show all posts

28 February 2012

Edit your jeans

Big announcement: I'm pregnant! I thought I'd preface the post with that for a few reasons: 1 - it might be a little weird if I randomly showed up with a baby on the blog later this year. 2 - I wouldn't want to keep you people in the dark forever. And 3 - I wouldn't have bought new jeans if my old ones hadn't become too small because I love my old jeans. Oh and 4 - now I can tell you part of the reason I've been posting so sporadically is the ridiculous tiredness that is the first trimester (glad to be done with that!).

I really didn't want to pay full price for something that can't be a permanent part of my wardrobe, so I've been hitting the sales and clearance racks. I found a pair of jeans that fit great and were comfortable, but the legs were very flared. A little too flared for my taste. I think they were on clearance for $15, so I didn't want to pass them up since I was pretty sure I could fix them.

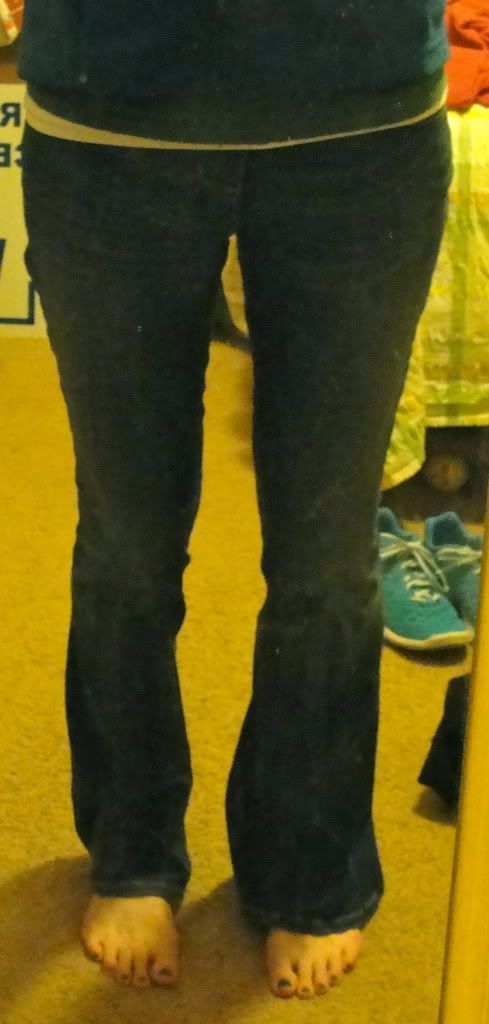
And I was right. Yay! This is how you can take flared jeans and change them to bootcut (or skinny for that matter). From pinning to having everything done, I would guess it took me less than 30 minutes. Definitely worth saving more than 50% in my opinion. Bootcut vs. original flared leg
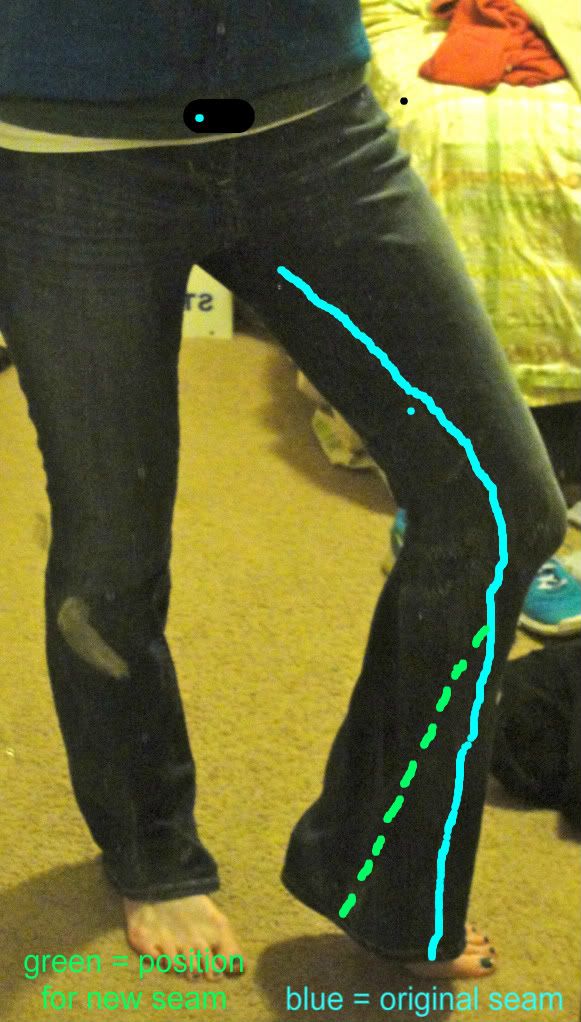
I didn't cut my jeans so if I decide I want them flared again at some point I can just take out the seam. This gives you an idea of where to pin (disregard the random black spot + blue blue dot, no idea how those appeared):
I just folded the excess on the inside and pinned it so the original seam went more straight down instead of coming out to the front (not sure that made any sense at all). The bottom seam was too big to fit in my sewing machine, so there was about an inch at the bottom I hand sewed. I didn't really worry about making it super sturdy since the rest of the leg was already sewed on.
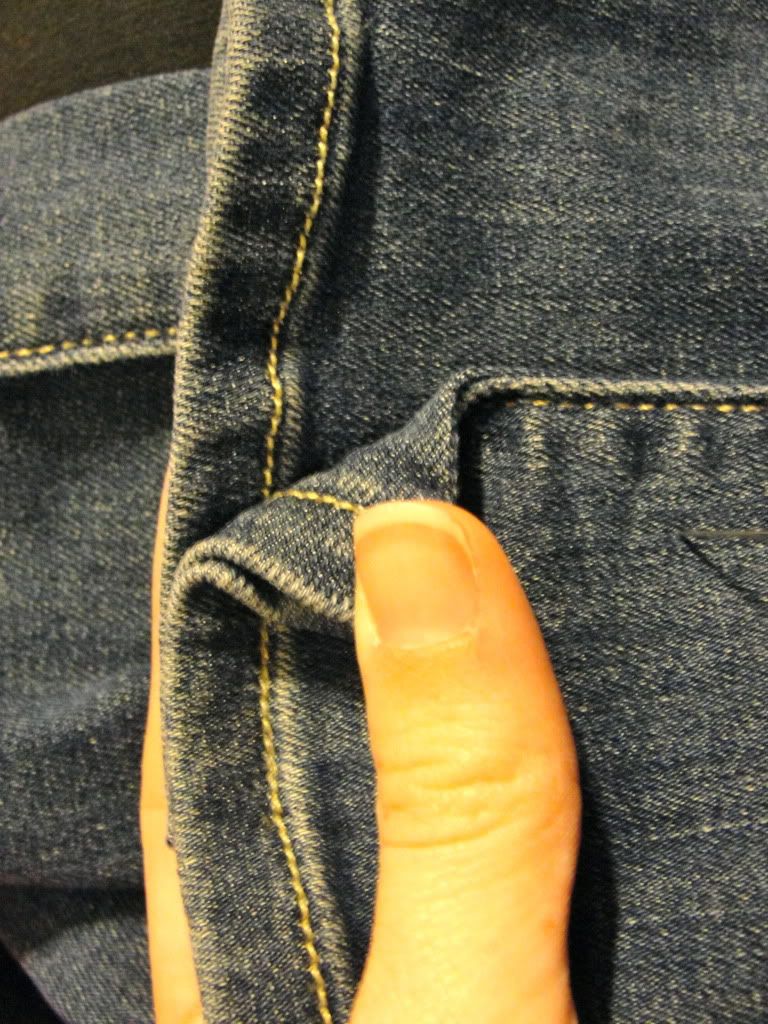
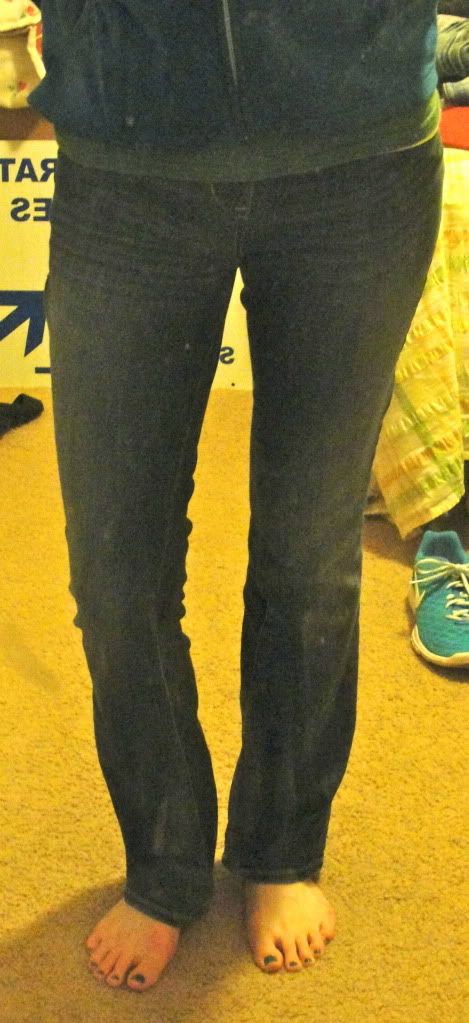
You can kind of tell from the picture above that I just kept the original seam and sewed over it. You can't tell unless you're really inspecting the seam up close and this way it looks like the jeans were made that way. I guess this wasn't the most detailed or informative post ever, but if you want more details feel free to get in touch. You could do this with any jeans, not just maternity. Here's the finished product:
Thanks for staying with me since I've been so spotty with posting. I actually already have another project halfway finished, so hopefully I can share that soon(ish)! Aaand I'll work on getting some better pictures for that one too : )
post signature

01 November 2011

Super Easy Headband

Bad hair day? Wake up with crazy bangs? Run out of time to wash your hair? Yeah, me too (hopefully not all three on the same day, but I can't say it's never happened). So I whipped up this headband to hide my hair. And it really couldn't be faster. I think it took me about 3 minutes. Faster than you could buy one at the store really.
Measure your head around where the headband would be (in other words, don't measure it like you're buying a hat because that won't help you). Mine was about 22". Find some knit fabric. I have some that's a little lighter and stretchier than a tshirt, but I'm sure a tshirt would work.

While holding the tape measure at 22" grab the fabric in two spots and see if it will stretch to 22".  I was going to take pictures of this but I don't have three hands, so pictures of me holding/measuring the fabric are pretty impossible. Here's kinda what you do with a paint picture:
Example: Hold the end of the fabric and tape measure; also hold fabric about 16" out and the tape measure at 22". Stretch the fabric until the tape measure is taught. Make sense? Hope so because I'm out of ideas for explaining/illustrating.

Cut a rectangle out. Mine ended up being 5" x 16". (Keep in mind my knit was stretchier than a tshirt, so if you're using a tshirt you might need it to be longer)
Sew the short ends together.
This is what it looks like after you sew.
And this is what it looks like turned right side out.
No, this one is not for my head. It's for a much smaller baby head. But it still stretches a lot, see?
(just ignore my leg in the picture, I was running into the whole not having three hands problem again)
Put it on your head (or somebody else's head).

And you're done. No need to sew up the edges because knit fabric won't fray. I see more knit headbands in my future! What's your solution for bad hair days?
post signature

29 October 2011

15 Minute Costume

Not only is this costume quick to make, it also costs a dollar or less! I went back and forth on whether I was going to dress up for a party since costumes were optional, but decided to go as a lego.
You can thank Hubs for the pose...he wouldn't take more pictures unless I did that. You know what's nice about being a lego (aside from the low cost)? You get to be comfy and wear jeans and a tshirt and your costume is easily removable if you get tired of it. To make yourself a lego you need a tshirt (you could go with colored pants too if you really wanted to be all lego-y), poster board, scissors, tape, and thread or string...oh and a ruler would be nice.
I had everything, but poster board so I spend $1 on the poster board. If you don't have a solid colored shirt without writing on it, just turn a solid shirt inside out and you're good to go! You could probably spend less if you went for white poster board, but I went with green. Cut the poster board down so that it's a little narrower than the width of your body.

You're going to cut six circles and six rectangles for your lego. I used a cup to trace out the circles. Measure the diameter of your circle and use the internet your middle school algebra skills to figure out the circumference. Or just keep reading because I'm about to tell you. :) My circle was 3.75" across.

3.75"x 3.14 = 11.8"  So now you cut six strips that are 2"x11.8". This is what you've got so far:
And now you assemble the dots on the lego. Sorry there aren't any pictures, I was in a hurry when I made it so I didn't stop for pictures. Or maybe I should say your welcome because my paint drawings are like works of art. :)
Those gray pieces are tape FYI. I tried to do most of the taping on the inside of the cylinder. There was one piece on the outside where I taped the rectangle together so I just made sure that side was toward the ground when I taped it to the poster board. Stick a couple pieces of tape on the inside of your cylinder and stick the cylinders to the poster board.
Now you just need to punch a couple holes tie yarn or thread or whatever you have on hand in each hole so you can wear it like a giant poster board necklace.
(the color of the lego and my shirt match a little better in real life, the flash made the colors look a little different)
Hopefully this helps out anybody that's looking for a super fast, super cheap costume! Oh, and if you're wondering how it went over...everybody thought it was great at the party (and they had no idea I threw it together in 15 minutes)!
post signature

22 July 2011

Pillowcase dress for baby

Guess I'm on a little bit of a baby clothes making kick. I decided to make a top similar to a pillowcase dress for myself, got halfway through and decided to make a pillowcase dress for a friend at church who's having a baby girl soon. Too bad my top won't be able to compare in cuteness since it's hard to beat a tiny dress with a bow like this.
I think I may like this one even better than the last baby dress I made. And it's even easier! (I just hope it fits...I didn't exactly use a pattern and didn't have any baby clothes to compare it to : / ) I looked around a little bit at patterns/tutorials for these, but wasn't seeing exactly what I was planning on doing so I basically threw everything out the window and just did my own thing.

Here's what I did, I'll update the post after baby gets to try it on and tweak the dimensions if I need to. Cut 2 rectangles 10"x15" (I would suggest cutting more like 12"x15" because mine looked really tiny). Cut curves out for armholes; I used this template. I scooted the template down about an inch from the top, like this:
Then I sewed the two rectangles together on the edges (right sides together). Hem the bottom; I folded the edge up 1/2" then up another 1/2".

I used this tutorial at Prudent Baby for finishing the armholes with bias tape. I think it really took the dress up a notch as far as looking more professional. And made me wish I was doing that on the shirt I started for myself haha.

For the top you need a tube to feed the ribbon or fabric tie through. I folded the edge under 1/4" then down about 1" and sewed along the edge. Kind of like the picture below.
Then you just feed your ribbon through and tie it in a bow.
Then say "aww that is so cute!' in a little baby voice. Oh wait, I guess you don't have to do that part, but I'm pretty sure that's what I did. : ) I was taking pictures of the dress for the blog, and you can really only take so many pictures of a dress hanging on a hanger. Since I don't have any spare newborns laying around I had to rope Fred into trying it on.
Sorry Fred.
I have to say, it does look pretty good, even on a monkey. Which means it should be even cuter on a little baby girl (assuming she can fit...). Stay tuned for possible pattern updates. The concept of the dress is really simple though, so you can just adjust the dimensions based on the size of the girl.

Have a great weekend!
post signature

07 July 2011

30 Minute Denim Shorts

These are super-quick to make. And you don't even need a sewing machine!
Who has a pair of jeans they never wear? Yeah, pretty much everyone. I just recently got the memo that flared jeans aren't all the rage anymore (you don't have to be embarrassed to be with me anymore sis!). So I had a pair that were a little tattered on the bottom hem, and I just wasn't crazy about the style.

I've had my eye on these shorts for a while, but was not about to pay $34.50 or even the sale price of $24.50.
Call me crazy, but I don't even like to pay more than $24.50 for my jeans and shorts have half the fabric! I'm also headed to Disney this weekend where it will actually be warm enough to wear shorts! Flared jeans I never wear + picture of cute shorts = new shorts for Susan!

I tried my jeans on and found where I wanted my shorts to end then made a mark 2" below that since I wanted to roll the bottom up. To cut the other leg the same I folded the jeans in half and marked my line to cut.
Just wanted to double-check and make sure I didn't cut one leg shorter than the other, so this is how they look before I rolled them up.
Next you're going to fold the bottom up about 1" and press. Then fold it up again (so the raw edge is hidden) and press again. You could just go with one fold and have the cut edge exposed, but I didn't want to deal with strings hanging off after I wash them.
After that I made a few stitches on each side to keep everything from moving around.
Now try them on and admire the shorts that you made in (probably) less than half an hour. For a whole lot less than $24.50.
And this is my "yay, I'm going to Disney" face!
So go find your slightly-less-stylish-than-they-used-to-be jeans and cut away!
post signature