Showing posts with label clothes. Show all posts

28 February 2012

Edit your jeans

Big announcement: I'm pregnant! I thought I'd preface the post with that for a few reasons: 1 - it might be a little weird if I randomly showed up with a baby on the blog later this year. 2 - I wouldn't want to keep you people in the dark forever. And 3 - I wouldn't have bought new jeans if my old ones hadn't become too small because I love my old jeans. Oh and 4 - now I can tell you part of the reason I've been posting so sporadically is the ridiculous tiredness that is the first trimester (glad to be done with that!).

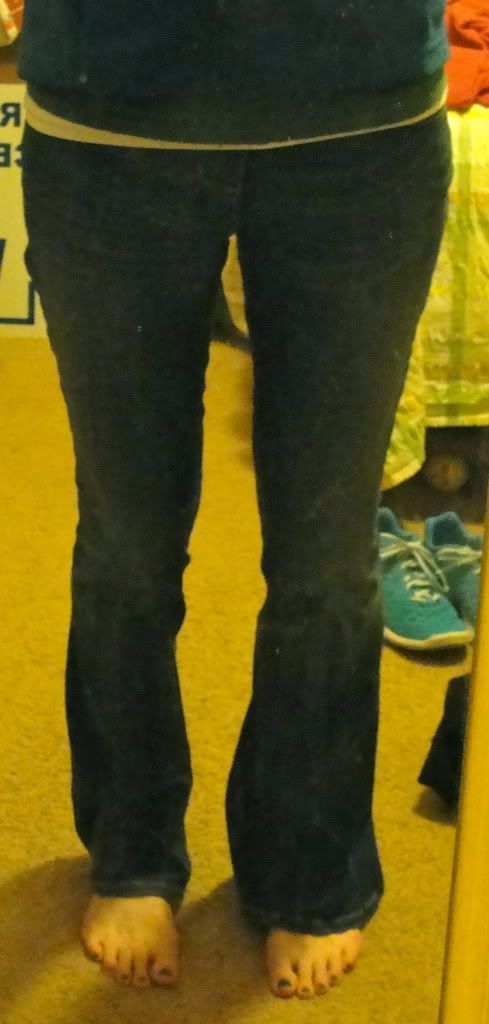
I really didn't want to pay full price for something that can't be a permanent part of my wardrobe, so I've been hitting the sales and clearance racks. I found a pair of jeans that fit great and were comfortable, but the legs were very flared. A little too flared for my taste. I think they were on clearance for $15, so I didn't want to pass them up since I was pretty sure I could fix them.

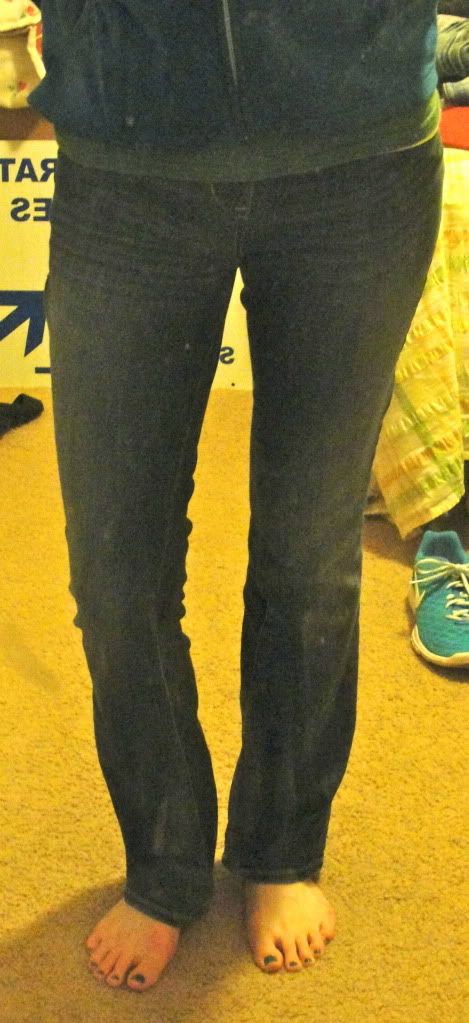
And I was right. Yay! This is how you can take flared jeans and change them to bootcut (or skinny for that matter). From pinning to having everything done, I would guess it took me less than 30 minutes. Definitely worth saving more than 50% in my opinion. Bootcut vs. original flared leg
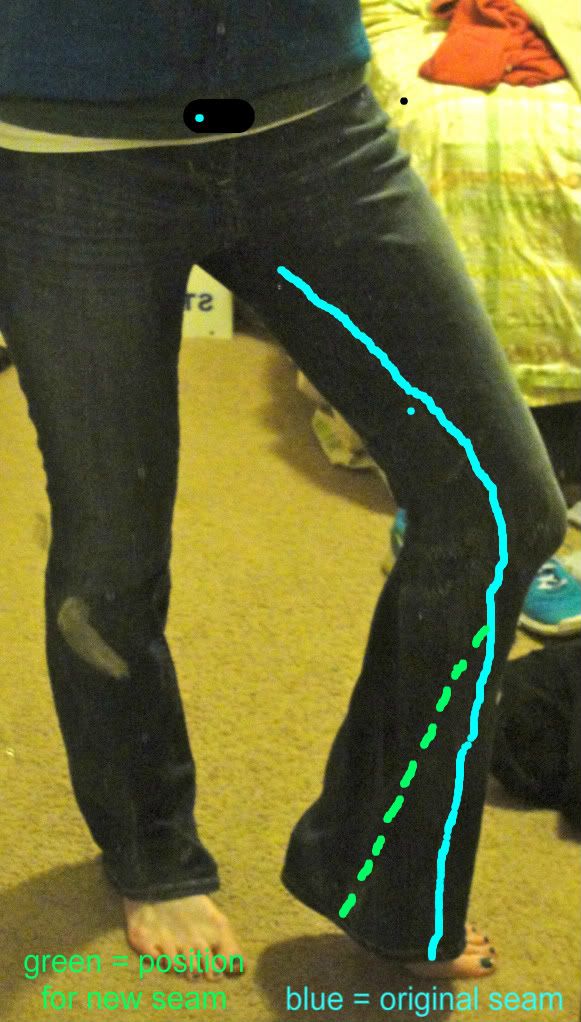
I didn't cut my jeans so if I decide I want them flared again at some point I can just take out the seam. This gives you an idea of where to pin (disregard the random black spot + blue blue dot, no idea how those appeared):
I just folded the excess on the inside and pinned it so the original seam went more straight down instead of coming out to the front (not sure that made any sense at all). The bottom seam was too big to fit in my sewing machine, so there was about an inch at the bottom I hand sewed. I didn't really worry about making it super sturdy since the rest of the leg was already sewed on.
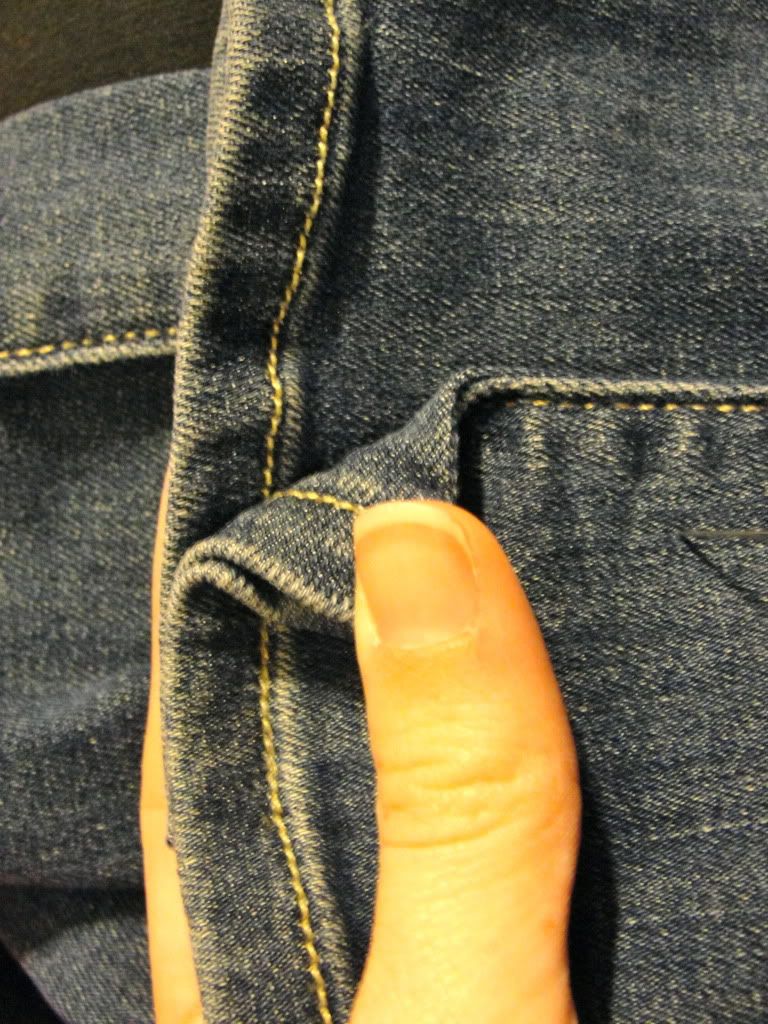
You can kind of tell from the picture above that I just kept the original seam and sewed over it. You can't tell unless you're really inspecting the seam up close and this way it looks like the jeans were made that way. I guess this wasn't the most detailed or informative post ever, but if you want more details feel free to get in touch. You could do this with any jeans, not just maternity. Here's the finished product:
Thanks for staying with me since I've been so spotty with posting. I actually already have another project halfway finished, so hopefully I can share that soon(ish)! Aaand I'll work on getting some better pictures for that one too : )
post signature

22 July 2011

Pillowcase dress for baby

Guess I'm on a little bit of a baby clothes making kick. I decided to make a top similar to a pillowcase dress for myself, got halfway through and decided to make a pillowcase dress for a friend at church who's having a baby girl soon. Too bad my top won't be able to compare in cuteness since it's hard to beat a tiny dress with a bow like this.
I think I may like this one even better than the last baby dress I made. And it's even easier! (I just hope it fits...I didn't exactly use a pattern and didn't have any baby clothes to compare it to : / ) I looked around a little bit at patterns/tutorials for these, but wasn't seeing exactly what I was planning on doing so I basically threw everything out the window and just did my own thing.

Here's what I did, I'll update the post after baby gets to try it on and tweak the dimensions if I need to. Cut 2 rectangles 10"x15" (I would suggest cutting more like 12"x15" because mine looked really tiny). Cut curves out for armholes; I used this template. I scooted the template down about an inch from the top, like this:
Then I sewed the two rectangles together on the edges (right sides together). Hem the bottom; I folded the edge up 1/2" then up another 1/2".

I used this tutorial at Prudent Baby for finishing the armholes with bias tape. I think it really took the dress up a notch as far as looking more professional. And made me wish I was doing that on the shirt I started for myself haha.

For the top you need a tube to feed the ribbon or fabric tie through. I folded the edge under 1/4" then down about 1" and sewed along the edge. Kind of like the picture below.
Then you just feed your ribbon through and tie it in a bow.
Then say "aww that is so cute!' in a little baby voice. Oh wait, I guess you don't have to do that part, but I'm pretty sure that's what I did. : ) I was taking pictures of the dress for the blog, and you can really only take so many pictures of a dress hanging on a hanger. Since I don't have any spare newborns laying around I had to rope Fred into trying it on.
Sorry Fred.
I have to say, it does look pretty good, even on a monkey. Which means it should be even cuter on a little baby girl (assuming she can fit...). Stay tuned for possible pattern updates. The concept of the dress is really simple though, so you can just adjust the dimensions based on the size of the girl.

Have a great weekend!
post signature

14 July 2011

Lena Beth and the tiny dress

I thought I'd share some pictures of the dress I made my niece! And share some pictures of her because she's adorable, and who doesn't want to see pictures of adorable babies?

I used the pattern from Made by Rae for the Itty Bitty Baby Dress. I used the bigger size since "little" Lena was 8lb. when she was born. I also enlarged it to 105% or 110%, I can't remember. I wanted her to be able to wear it for a while and since I haven't seen her in person (*gigantic sadface*) I didn't want to err on the too small side.
(See the tiny hanger? We didn't have any baby hangers and it was too small to fit on a normal one so I took one of those pants hangers you get from the cleaners, took the cardboard tube off and bent it to form an itty bitty hanger for an itty bitty dress hehe)

The dress came together pretty easily (read: no zippers on buttons to slow you down). But it did involve piping and bias tape, which I had never used before. And I still haven't used piping...I kind of just rigged the bias tape to work for that since I didn't have any on hand.
I untied the straps for a picture so you can see what the straps look like.
I also added an itty bitty tag so you could tell which was the front and which was the back (you might be able to see it better if you click on the picture to enlarge it). The front and back patterns are identical, so it wouldn't really matter except I put all of the seams for the bias tape/piping on one side and I wanted that to be the back.
Her Mommy and Daddy were sweet enough to take a picture of her wearing it for the first time!
I'm glad it's a little big, maybe she'll still be able to wear it when I visit next month! Now for a few more baby pictures because I'm a proud aunt : )
the happy family
It seems like whenever she is awake, she's looking around at everything. Especially in the top right picture, haha! My sister-in-law said she sat like that for a few minutes! I seriously can't wait to visit! A big thanks to everybody who's been snapping pictures and sharing them, I love seeing them.

If you have a baby girl or are related to one or remotely know one, I would really suggest this dress. The pattern was easy to follow, I finished it in an afternoon, and it doesn't require a ton of fabric since it's itty bitty. And it's tiny and cute - does anyone else notice that the tinier something is the cuter it is?
post signature

07 July 2011

30 Minute Denim Shorts

These are super-quick to make. And you don't even need a sewing machine!
Who has a pair of jeans they never wear? Yeah, pretty much everyone. I just recently got the memo that flared jeans aren't all the rage anymore (you don't have to be embarrassed to be with me anymore sis!). So I had a pair that were a little tattered on the bottom hem, and I just wasn't crazy about the style.

I've had my eye on these shorts for a while, but was not about to pay $34.50 or even the sale price of $24.50.
Call me crazy, but I don't even like to pay more than $24.50 for my jeans and shorts have half the fabric! I'm also headed to Disney this weekend where it will actually be warm enough to wear shorts! Flared jeans I never wear + picture of cute shorts = new shorts for Susan!

I tried my jeans on and found where I wanted my shorts to end then made a mark 2" below that since I wanted to roll the bottom up. To cut the other leg the same I folded the jeans in half and marked my line to cut.
Just wanted to double-check and make sure I didn't cut one leg shorter than the other, so this is how they look before I rolled them up.
Next you're going to fold the bottom up about 1" and press. Then fold it up again (so the raw edge is hidden) and press again. You could just go with one fold and have the cut edge exposed, but I didn't want to deal with strings hanging off after I wash them.
After that I made a few stitches on each side to keep everything from moving around.
Now try them on and admire the shorts that you made in (probably) less than half an hour. For a whole lot less than $24.50.
And this is my "yay, I'm going to Disney" face!
So go find your slightly-less-stylish-than-they-used-to-be jeans and cut away!
post signature