Showing posts with label toy. Show all posts

18 April 2011

Baby Name Taggie

I'm sure everyone has seen taggie blankets for babies (taggie? is that even the correct name? who knows). This is what I'm talking about in case the name is totally off base.
Thank you Google Images. I kind of remember seeing an idea that was like a taggie blanket, but just an initial. I liked that, but I thought I could do something a little different.
First I found a bubbly font and made it really big then cut out the letters after they had been printed. This should give you a little size reference.
I think I had two letters per sheet of 8 1/2" x 11" paper. Once you have your letters you can trace them onto the fabric. I added a little extra for seam allowances so the letters would end up about the same size as the printed letters. Since I used fleece it didn't matter as much about wrong/right sides, but when you're tracing and cutting just double check that the right sides will be out when everything is assembled.

Sorry I don't have more in-process pictures. Sometimes I get started and forget about blogging/picture taking until I'm done. (That and I didn't decide whether I would post this or not until this morning : ) Then cut little ribbons and pieces of fabric and felt to your little heart's content!

Pin everything together like this: letter piece 1 (right side up), ribbon with ends sticking out, letter piece 2 (right side down). Maybe that made sense? I briefly thought about bringing in one of my masterful paint drawings to help explain, but in every case this case I think it might make it even more confusing. Leave a hole for turning - preferably one that is larger than your finger!

Stuff, sew up the hole, and you're done! I don't remember how long this took me, but I don't think it was a really long time (wow, so helpful of me to share that piece of information, I know). Here's a side view so you can see the stuffed puffiness of it.
I almost forgot about one part! I made a loops with velcro on each letter so you can attach the letters or have them separate.
I thought it would be fun to be able to take them apart and put them back together. Plus, this way if he decides to change his name to Zera or Raze this gift still totally works. Hah!
post signature

17 February 2011

Barnyard Finger Puppets

I finally finished my 2nd set of crocheted finger puppets! I'm noticing a trend of "finally" finishing things...so either I'm really impatient or it actually takes me a long time to finish these things. Here's a link to the patterns. I'll give the pattern for the lamb at the end of this post since I partially made that one up myself.

Now for some disclaimers about the pattern. I still consider myself somewhat of a beginner at crocheting (meaning I've completed less than 10 projects, I don't have all of the different stitches memorized, and I ALWAYS mess up at least once during a project). This pattern doesn't have any complicated stitches (thankfully), but I would be lying if I said it wasn't tedious. All those little features are fairly easy to make, but sewing them on is a drag. I get frustrated when people say things like, "this was so easy!" or "I knocked this out in an evening!" So that will not be the case with these, just being honest. Unless your evening consists of several uninterrupted hours of crocheting. But maybe I'm just slow.

Aaaanyway, the reason I still make them even though it can get tedious is they are so stinkin' cute! I mean check out these feathered friends. I LOVE the comb on the rooster's head! Comb aka red thing on top of a rooster's head - I had to look that one up on Google : )

And they all have cute little tails too!
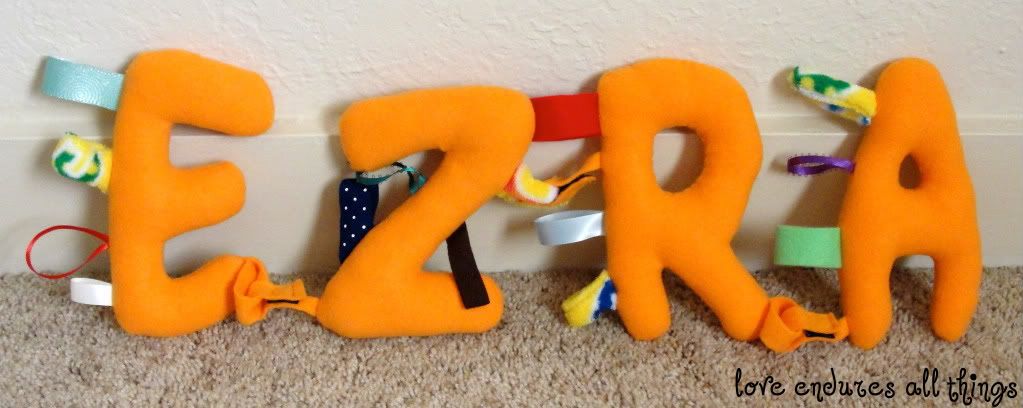
The whole line-up.

So here's the scoop on the lamb. Last time I made the cute little piggy from the pattern. See?
Awww :) I wish you could see the cute curly tail too. But I had no pink yarn. And I already spent my crafting budget for the next two months didn't feel like buying any, so the lamb was born...er...crocheted. Kind of sad how many brown/tan/khaki/cream yarns I have.

Lamb pattern: make basic body
Muzzle: use pattern for dog muzzle
Ears: chain 4, single crochet in 2nd chain from hook, single crochet in next 2 stitches. Turn and chain 1. Next row - single crochet in 1st stitch; in next stitch do 1 half double crochet, 1 double crochet, and 1 half double crochet; single crochet in last stitch. Fasten off. Fold the ear in half and stitch together. Sew ear to the side of the head.
Face: chain 5, single crochet in 2nd chain from hook, single crochet in next 3 stitches. Turn and chain 1. Next row - 4 single crochet, then fasten off. Sew the face onto the body just above the nose, stitch around the edges of the face.
Tail: gather about 10-12 strands of yarn. Tie together in the center (leave a long tail on the knot to attach to the body), then trim to desired tail length. Fluff the tail (a lot!) to get it to be a little fluffy ball. Attach to the body near the bottom. See the diagram below for a better explanation.
Hopefully my superb drawing skills (hehe) make up for my less than stellar crochet pattern writing skills. Despite all of the griping I did about the details, I think this project is worth the time involved. Just look at their tiny cute faces!
post signature

PS - I'm very sorry for way overusing the word 'cute' in this post. But really...how else would you describe them?

24 January 2011

Grab Ball Toy

So there's a chance this is old news to some people, but somebody recently showed me a grab ball they made. I promptly started scouring the internet to find it, and found the pattern...for free! Here's the link: Grab Ball Tutorial. The tutorial was a little confusing at some points for me, but I'm also pretty new to sewing. A little tip if you want to save time (read: you're lazy and/or some steps in sewing patterns seem pointless and time consuming) here are a couple things I skipped. I didn't press any seams, actually I rarely ever press any seams on anything. I guess it's a wonder the stuff I make even turns out. I also didn't trim any of the corners off. I mean what's the point of that really? You're going to stuff the thing, so what's a little extra fabric on the inside? I used the plump version of the pattern. Here's how mine turned out!


I used snuggle fabric, which made for a very soft and snuggly ball. It was a little harder to work with though since it was so plush. If you want to avoid extra hassle and LOTS of fuzzies everywhere on everything that even thought about being near the fabric, you should go with something else. Sorry I didn't take more pictures during the process. If you want to imagine that I did, just picture that ball, not stuffed and in pieces, and little pieces of yellow fluff eeevverrrywhere (including my hair on one occasion).

It's a good project to do if you craft in spurts because you can just finish one section and easily come back to do another one later without having to figure out where you left off. Overall though I was thrilled with how it turned out. I'm thinking the plump version might be a little more forgiving if you make minor mistakes or your seams aren't totally straight because everything ends up smooshed together. I actually liked it so much I thought about making one for me and my husband. We don't have kids, but it is pretty fun to throw around...What? We had to test it to make sure it was safe (and fun) for the baby who's getting it as a gift. :)

11 January 2011

Socktopus

I can't remember now what exactly gave me the idea to make a socktopus for my cousin for Christmas, but at some point I decided it would be the perfect gift. You may still be thinking, "Socktopus...what in the world is that??" That's perfectly normal because I haven't seen a whole lot of socktopi floating around.

A socktopus (plural: socktopi - hey I get to create the plural form if I made it up, right?) is based on the concept of a sock monkey, but it's an octopus instead of a monkey...I'm thinking that last part might have been obvious by now, but there you have it in case you were still wondering.

I wish now I had taken pictures during the process, so I could make sort of a tutorial. Unfortunately, I can be a little overly focused when I'm making something and the fact that I might want to remember how to do it later / blog about how I made it didn't even enter my mind at the time. I started with four new pairs of socks. It was a little tricky trying to find cute knee socks in boyish colors, but it worked out in the end. I used fairly thin socks, and it might work out a little better if you can find thicker socks to use. The socktopus will probably feel sturdier with thicker socks.

Ok, now that I've started writing steps two different times and ended up erasing them I realize it's a little too complicated for a short blog post. Basically I used the tube part of all of the socks for legs - you get 2 legs per tube. For the body, I attached two feet from one pair of socks. I left one of the socks I used for the head completely intact (meaning I didn't cut the tube off, so those two legs were already attached to the body). Then I stuffed everything and attached everything. I used a book on how to make sock monsters that Hubs got me a couple years ago to figure out how to make the mouth.

So there's the very quick and dirty explanation. :) Confused? Well I would be if I hadn't made the thing! If you want to know how to make it, I can give you a more detailed explanation. It really isn't that hard because I had only used my sewing machine a few times before I did this. Hopefully everyone hasn't totally given up on me at this point because now I'll finally get around to pictures!

Just chillin' in my office chair.

Socktopus waiting to be wrapped for Christmas.

Thankfully, the present was a hit. Although I'm not sure who liked it more, my cousin or everybody else. Hard to say since he can't talk yet, but I'll take the slobbering all over socktopus' head as a good sign!