Showing posts with label cooking. Show all posts

28 October 2011

Mac and Cheese+

I've been cooking more lately. (Go me!) And I thought I'd share last night's recipe with you. I found the recipe on Pinterest and it's Skinny Broccoli Mac and Cheese at Feeding my Temple. After eating it I thought I'd make a few changes.

The original recipe is tasty, just not exactly how we prefer it. The recipe I list doesn't have any meat in it, but we really thought it would be even better with some ground beef or cubed ham so you might give that a try too.

Ingredients for 2-4 servings (depending on how hungry Hubs is):
  • 6 oz whole wheat pasta
  • 12 oz broccoli (I used frozen)
  • 1 Tbsp butter or margarine
  • 2 Tbsp whole wheat flour
  • 1/4 cup minced onion
  • 1 cup skim milk
  • 1/2 cup chicken broth
  • 1 cup shredded 2% cheddar (plus a little to sprinkle on top)
  • salt and pepper
  • parmesan cheese for sprinkling on top
Preheat oven to 350. Cook pasta and broccoli according to directions. I boiled the broccoli then scooped it out and put the macaroni in since the water was already boiling.

Melt butter and cook onions on low for a few minutes in a skillet. Next, add flour and stir/cook for another minute. Add milk and chicken broth. Stir and turn heat up to medium-high until it starts boiling. Cook for about five minutes on medium until the sauce gets thicker. At this point you can add any salt/pepper you want.

Remove from heat and stir in cheese. Stir the sauce, pasta, and broccoli in a greased baking dish. Sprinkle the top with cheddar and parmesan and bake at 350 for 5-10 minutes.

Aaand I didn't take any pictures, so here's a picture of the leftovers. Umm, actually Hubs got home early from work and ate the leftovers before I could take a picture. Whoops. Here's kinda sorta what it looked like fresh out of the oven.
If you want pictures, go check out the recipe on Feeding my Temple :) The original also makes more servings (although the proportions are different, we wanted more broccoli and onion). I hope everybody is having a good week!
post signature

19 August 2011

Banana Chocolate Chip Bread

I'm mixing things up today with a recipe. Hubs has been begging asked me to make some banana bread since he seems to consistently buy two more bananas than he can eat before they go bad (maybe that's his way of hinting at banana bread haha). But not just any banana bread, he also asked for peanut butter, chocolate chips, and protein powder. If you knew Hubs, you'd know that's a pretty typical request. Let's just say he likes to experiment.
The pictures aren't the best because I didn't think to take any until I was already in the middle of everything so I just used my cell phone. I based this off of a Betty Crocker recipe, but I think the eggs, baking soda, and salt are the only things that remained the same so I don't feel bad about sharing my recipe. That and Hubs said it might be the best banana bread he's ever had, so I had to share.

Ingredients:
  • 1/4 c unsweetened applesauce (mine was actually unsweetened cinnamon applesauce)
  • 1/4 c creamy peanut butter
  • 1 1/4 c Splenda (actually calls for sugar but we were out)
  • 2 eggs
  • 1 1/2 c mashed ripe banana (you know the brownish ones that no one wants to eat)
  • 1/2 c buttermilk (or 1/2 TBS white vinegar + enough milk to make 1/2 c and let sit for 5 minutes - that little substitution is compliments of Betty)
  • 1 tsp vanilla
  • 2 1/2 c  whole wheat flour
  • 1 tsp baking soda
  • 1 tsp salt
  • 2/3 bag of chocolate chips (or something like that, just add until you're happy with the chip level)
Mix the applesauce, pb, and Splenda until smooth. Add eggs and mix. Then add banana, buttermilk (or substitute), and vanilla and stir.
Add the dry ingredients and stir until everything is moist. I used a spoon rather than a mixer to avoid over-mixing. Now add the chocolate chips and stir them in. I promise there really isn't that much stirring/mixing, but apparently I just don't know many synonyms for stir.
Grease the bottom only of a pan. I used 8x6. No, not any kind of loaf pan. Somehow I've made it years without one so I didn't feel like getting one now. And I wasn't feeling a bunch of mini loafs (I do have those pans they just seem to take forever to bake). Bake at 350 degrees with the rack in a low position so the top of the pan is in the center of the oven. It only took about 45 minutes to cook, but keep an eye on it after about 30 minutes if you use the 8x6 because the outside started to get a little darker about that time.
And this little guy kept visiting the kitchen window. I'm pretty sure he could smell the bread because he came right up to the window even though I was standing there taking his picture with my cell phone like a crazy lady.
 Finished giganto loaf!
Oh, if you're wondering where the protein powder was in all of that, it's still up in the cabinet. With all of the other substitutions I completely forgot about it. So I have no advice for you on that front, sorry. It's a good thing I took a picture as soon as it came out of the oven since we polished off the entire loaf as snack + dinner.

If anybody has any extra cooking motivation laying around (or recipes for dinners that leave you with fewer dirty dishes than you started with), please send it my way. I've been seriously lacking in the cooking department lately and these other bananas aren't baking themselves.

And the winner of the Uprinting giveaway is Emilee (picked by random.org)! Congrats!! I've already contacted Emilee, so she'll be rolling in custom postcards soon.
post signature

12 July 2011

Cake Pop Dos and Don'ts

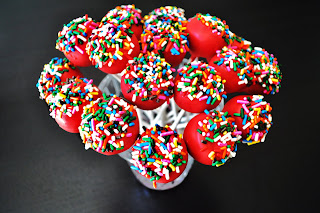
I have been in love with cake pops for a while. Who wouldn't after seeing pictures like these?
Could cake BE any cuter??

Yeah, those definitely aren't mine. I thought I'd pass on my experience and also send you to the site I used when I was working on them (Suburbs Mama made the red ones in the first picture). Pretty basic step-by-step instructions, although she used a stand mixer and I didn't.

In case you've been living under a rock don't know what cake pops are, I'll fill you in. Baked cake, crumbled up and mixed with frosting then dipped to form a candy or chocolate shell.

I doubled the recipe since we had friends staying with us and the baby shower. I made 2 funfetti cakes (and remembered how ridiculously easy it is to make cake from a box, it was great). I let them cool overnight then piled them in the biggest bowl we own. It was really nice to not worry about getting the cakes out of the pan nicely.
It was a lot of cake!
Then I started stirring it. I think I used a fork mostly. It was my arm workout for the night. Ok, it wasn't that hard, but those cakes don't crumble themselves.
The size condensed quite a bit when it was crumbled, but that didn't save me from spewing crumbs on the table a few times in the process.
Having your laptop near the bowl isn't the best idea FYI. Unless you like funfetti on your keyboard. Then you should scoot it as close to the bowl as possible! In the picture above I had already started stirring the frosting in (1/2 tub of frosting per cake, so I used the whole package of frosting), so the mixture was even smaller. Make sure the cake and frosting are combined really thoroughly...when I got down to the bottom of my mixture I realized the frosting didn't make it all the way down.

Then you get messy. There's really no getting around it. Start forming the cake balls. I put some on waxed paper and some on foil I think. Anyway, they go into the freezer for 10-ish minutes.
In the tutorial, her freezer is seemingly empty. I don't know how she maintains that, but ours needed some serious rearranging to fit the cake pops in. I found I could roll about 30 pops in 10 minutes. Overall the two cakes make around 60-70 pops. That's definitely an estimate because this was over a week ago now and I didn't write anything down. : )
Melt a little of your candy/chocolate coating and dip the stick in then put the cake pop on. I picked all of the pops up to put the stick in because I didn't want to end up with a bunch of flat-topped cake pops from pushing them into the pan. (Hopefully that made sense...little did I know, I could've left the balls lumpy since my dipping job wasn't the best) Then back into the freezer for 20-ish minutes (this took even more rearranging since the pops now had sticks).
The final step was by far the hardest in my opinion. Actually, everything up to this point was pretty easy. Follow the directions for melting the candy melts and start dipping (I used two 12 or 14 oz packages of the candy melts and it wasn't quite enough to cover all of the pops). Most tutorials mention "tapping off the excess" which is a great idea. Nobody wants a clumpy thick shell, but if I got a little too tappy the cake pop fell off the stick : (
Of course the guys didn't mind a few cake pop casualties, but I'm not sure how to avert certain cake pop death. Maybe my pops were too big or I didn't push the stick in far enough. Also, I was too cheap to buy a styrofoam block to stick them into while they dried. That was dumb. Save yourself some stress and shell out $3 for one. Cake pops are not very good at balancing in cups.
I was constantly performing a balancing act, putting the wet ones into the coffee mug or glass then rotating them to the mason jars when they were dry. (And using tons of napkins because occasionally I had to catch one that decided to jump out of the drying cup so I kept getting the melted candy all over my hands.)
Sadly, those are the closest to finished pictures I got. I made half of them with a chocolate coating and served them in the mason jars. I didn't realize the sticks wouldn't be tall enough for the mason jars so I ended up putting marshmallows in the bottom to prop the sticks up. In the end I really liked having the marshmallows in the mason jars, I thought it kind of went with all of the other polka dot elements.

Even though they weren't as smooth as I was hoping for they were a big hit at the shower and probably an even bigger hit with the guys. We had no problem finishing off the leftovers! I will probably try making them again at some point (they were seriously really tasty and slightly addictive). I will not make them again unless we're having people over though. This is probably the unhealthiest dessert I've made in...well, a long time. It's no big deal if you only have 1 or 2, but they definitely aren't very nutritious.

Good luck if you try making them, and even if they're ugly they'll still be yummy : ) I'd love to hear any tips you have on making the candy shell smoother and/or how you get the cake pops to stay on their stick while you dip them!
post signature

06 April 2011

Alien Smoothies

We have a new favorite way to eat veggies where we pretend not to eat veggies. Sounds great, right?
Oh, I guess I forgot to mention it doesn't always look great. This night's variety included lots of strawberries and spinach. Red + Green = not a particularly appetizing color for your food. Tasted great though!

 I'm sure you're just dying to make something that color to eat, yeah right, but I don't have an exact recipe for these. So all of you "must follow a recipe exactly" types (ahem...Mom) are kind of out of luck. I'll tell you what we've used in the past and you can try out your own combination!

Alien Smoothie (Hubs said he felt like an alien when I first made this one. It was pretty bright green.)
  • Spinach
  • Crushed pineapple (from a can)
  • Pineapple juice from the crushed pineapple can
  • Frozen banana
  • Yogurt - vanilla or lemon, I can't remember
  • Mango sorbet (yum!!)
  • Vanilla protein powder <--that part is definitely for Hubs
  • Diet green tea - what? we were out of juice and needed something to help everything blend!

Less Pretty Variety
  • Spinach
  • Vanilla yogurt
  • Strawberry banana juice from TJs
  • Frozen mixed fruit - not sure how cost effective this is, but it sure was convenient! A bunch of strawberries happened to be at the top when I dumped some in mine but it also had grapes, peaches and mangoes
  • Soy milk
  • Vanilla protein powder...or not, we've made them both ways

When I make them I usually go pretty easy on the juice/milk/tea. The more you put in, the runnier your smoothie will be. Really it's just helpful to get everything blending and not so stuck together. We get at least a serving of spinach in each smoothie, woohoo! This makes up a big part of our meal because of all the sugar, so keep that in mind if you're counting calories. If you're not buying frozen fruit, make sure something in the smoothie is frozen unless you like really runny smoothies. I guess my only other advice is to experiment and use what you have. These are a great way to use up fruit that's about to go bad.

Maybe I'll remember to snap a less disgusting more appetizing picture the next time we make them!
post signature

31 January 2011

Crunchy Chicken

Busy weekend for us since my parents were visiting. I haven't really done anything crafty in the last week, so I thought I'd share an old stand-by recipe I started using in the past year...which I guess makes it not so old, but whatever. You only need three things: boneless chicken breasts (or strips), honey mustard, and those french fried onion things that you use for green bean casserole. You should use honey mustard for sandwiches, not honey mustard salad dressing. I think the salad dressing would be much too runny.
  1. Squirt a bunch of honey mustard (HM) on a plate or in a tupperware dish. 
  2. Dump a bunch of crunchy onions (COs) in  another dish.
  3. Roll the chicken around in the HM.
  4. Roll the chicken around in the COs.
  5. Put them on a pan. Bonus: cover the pan in foil and then you don't even have to mess with cleaning the pan! 
Cook time depends on the cut of the chicken. I always at least halve breasts because they take forever to cook otherwise (it seems like forever when you're hungry anyway). Oven should be around 375 and cook anywhere from 10-25 minutes. Just make sure the chicken isn't pink and isn't burnt and you should be good to go.

I've also had success using crunched up Sun Chips. Perfect for when you only have crumbs left and nobody really wants to eat the last of them. Just remember your hearing protection if they're still using those terribly loud bags.

If you're looking for something even easier, go to the nearest Trader Joe's (or TJ's as we affectionately call it) and pick up some Mandarin Ginger Chicken from the freezer aisle. That stuff is AMAZING!! And I'm pretty sure that's the right name, if not it definitely has mandarin in the name and it's in an orange bag. We've had it twice in one week before. Just pair it with some brown rice and you have a meal.

Here's what we were busy doing this Saturday:


Seeing whales. Well, more precisely, seeing parts of whales. Unfortunately I didn't catch any Free Willy jumps, but then again these were gray whales so that probably isn't their style. It was fun though. If you ever go on a whale watching tour in central/northern CA, dress much warmer than you think is necessary...and have fun! :)

26 January 2011

Playing Catch-Up

Number of blog posts started in the last week but not posted (or even halfway complete): 3

Number of hours I spent on the phone for work yesterday: 2 and 1/2 (with only about a 15 minute break in the middle). Did I feel like I was melting into a pile of blahness in my chair after being on the phone for so long? Yes.

State of our house: eh, not terrible but definitely not ideal (see birthday cooking mess below)

Birthdays: Bro-in-law's bday was last week...and his card is still on my desk...hopefully he knows we didn't forget about his birthday all together, it took us over a week to decide what to get him.

Hubs' bday was yesterday and a success, I think :) Although one present won't be here until Thursday. I'm telling myself that just means he gets to stretch the celebration out for the whole week! And here's the aftermath of cooking three meals plus a cake yesterday:

Whittled it down to just a few dishes last night, yay! 
 
PS - Do you see the lack of counter space I'm dealing with? I knew it wasn't much, but seeing this picture made it stand out even more. There's not really much available space on the other side of the kitchen either unless there are no clean or dirty dishes (no dishwasher, sigh). Also, now I feel compelled to do a post about how much we love our house because we really do. But when you live in a house that's almost 102 years old you have to put up with some annoyances of the things that give it character.

On a happier note - some other birthday highlights from yesterday:

Happy Birthday Hubs! You're awesome and I wish I could've
given you the day off of work yesterday for your bday! I'm especially thankful you 
were born because I got the best husband anyone could hope for out of the deal!

No icing on the cake due to icing failure
FYI almond extract is not always a good substitute for vanilla extract. 


Rather than mush together bits and pieces of three unfinished posts into one (you're welcome) I'll try to just wrap up with my new cleaning strategy. I say try because I'm finding that I have a terribly hard time staying on topic when I write! Guess Hubs is right about my train of thought being all over the place when we're talking :/

I don't like doing dishes, therefore the kitchen is rarely spotless. I don't really have a good excuse for the rest of the house. So I have a new game plan. I'm hoping that by putting it on the internet I'll stick to it because if it's on the internet, it must be true. Hah.

Monday, Wednesday, and Friday
Spend 20 minutes each evening picking up clutter and just generally tidying up the place.

Tuesday, Thursday, and Saturday
Dishes. Do them. 

Sunday
Alternate between vacuuming and moping/cleaning tub and toilet.

So I'll let you know if this pans out. I'm hoping to have a sparkling house from now on and live happily ever after :) I think I can still get the happily ever after either way and we'll just have to see what happens with the sparkling house.

20 August 2010

Taco Bell, I've got your number!

This week I discoved how to make quesadillas that taste just like Taco Bell's, but they're healthier! I tried it for myself last night, and went on and on to Hubs about how good it was. He believed me, but admitted that he didn't realize just how good they really were until I made him one today for lunch. Now I don't really NEED to go to Taco Bell anymore (unless, of course, I'm craving a Mt. Dew Baja Blast).

In case anyone else would like to know the secret to my quesadilla success, I'll share. :) This is just what I used, if you prefer non-whole wheat tortillas that would probably work too.

  • Mission Whole Wheat Carb Balance Tortillas (burrito size)
  • Kraft 2% Mexican blend cheese
  • Taco Bell sauce (comes in a smallish bottle at the grocery store)
  • Oscar Meyer Rotisserie Chicken lunch meat (much faster than actually cooking chicken yourself)

On half of the tortilla I layered cheese, sauce, meat, sauce cheese then folded the tortilla in half and stuck it on our handy dandy George Foreman grill. Flipped it over once while it was cooking, and VIOLA! Out comes a Taco Bell quesadilla Susan style.

And while I'm on the topic of food, I might as well expound on the Mission Carb Balance Tortillas. I'm not sure why they're called carb balance, I just know they're whole wheat. We've tried probably every brand/kind of whole wheat and/or multi-grain tortilla out there and this one far surpasses the competition. It's chewy and not dry AT ALL. We use them all the time for wraps, burritos and now quesadillas. Honestly, I hardly notice a difference between it and a regular flour tortilla. So you get all the yumminess of a flour tortilla plus the benefits of whole grain! ....do I sound like a commercial or what? haha

Happy Friday everybody!