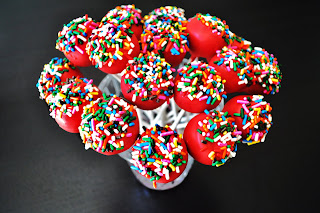
I have been in love with cake pops for a while. Who wouldn't after seeing pictures like these?
Could cake BE any cuter??
Yeah, those definitely aren't mine. I thought I'd pass on my experience and also send you to
the site I used when I was working on them (Suburbs Mama made the red ones in the first picture). Pretty basic step-by-step instructions, although she used a stand mixer and I didn't.
In case
you've been living under a rock don't know what cake pops are, I'll fill you in. Baked cake, crumbled up and mixed with frosting then dipped to form a candy or chocolate shell.
I doubled the recipe since we had friends staying with us and the baby shower. I made 2 funfetti cakes (and remembered how ridiculously easy it is to make cake from a box, it was great). I let them cool overnight then piled them in the biggest bowl we own. It was really nice to not worry about getting the cakes out of the pan nicely.
It was a lot of cake!
Then I started stirring it. I think I used a fork mostly. It was my arm workout for the night. Ok, it wasn't
that hard, but those cakes don't crumble themselves.
The size condensed quite a bit when it was crumbled, but that didn't save me from spewing crumbs on the table a few times in the process.
Having your laptop near the bowl isn't the best idea FYI. Unless you like funfetti on your keyboard. Then you should scoot it as close to the bowl as possible! In the picture above I had already started stirring the frosting in (1/2 tub of frosting per cake, so I used the whole package of frosting), so the mixture was even smaller. Make sure the cake and frosting are combined really thoroughly...when I got down to the bottom of my mixture I realized the frosting didn't make it all the way down.
Then you get messy. There's really no getting around it. Start forming the cake balls. I put some on waxed paper and some on foil I think. Anyway, they go into the freezer for 10-ish minutes.
In the tutorial, her freezer is seemingly empty. I don't know how she maintains that, but ours needed some serious rearranging to fit the cake pops in. I found I could roll about 30 pops in 10 minutes. Overall the two cakes make around 60-70 pops. That's definitely an estimate because this was over a week ago now and I didn't write anything down. : )
Melt a little of your candy/chocolate coating and dip the stick in then put the cake pop on. I picked all of the pops up to put the stick in because I didn't want to end up with a bunch of flat-topped cake pops from pushing them into the pan. (Hopefully that made sense...little did I know, I could've left the balls lumpy since my dipping job wasn't the best) Then back into the freezer for 20-ish minutes (this took even more rearranging since the pops now had sticks).
The final step was by far the hardest in my opinion. Actually, everything up to this point was pretty easy. Follow the directions for melting the candy melts and start dipping (I used two 12 or 14 oz packages of the candy melts and it wasn't quite enough to cover all of the pops). Most tutorials mention "tapping off the excess" which is a great idea. Nobody wants a clumpy thick shell, but if I got a little too tappy the cake pop fell off the stick : (
Of course the guys didn't mind a few cake pop casualties, but I'm not sure how to avert certain cake pop death. Maybe my pops were too big or I didn't push the stick in far enough. Also, I was too cheap to buy a styrofoam block to stick them into while they dried. That was dumb. Save yourself some stress and shell out $3 for one. Cake pops are not very good at balancing in cups.
I was constantly performing a balancing act, putting the wet ones into the coffee mug or glass then rotating them to the mason jars when they were dry. (And using tons of napkins because occasionally I had to catch one that decided to jump out of the drying cup so I kept getting the melted candy all over my hands.)
Sadly, those are the closest to finished pictures I got. I made half of them with a chocolate coating and served them in the mason jars. I didn't realize the sticks wouldn't be tall enough for the mason jars so I ended up putting marshmallows in the bottom to prop the sticks up. In the end I really liked having the marshmallows in the mason jars, I thought it kind of went with all of the other polka dot elements.
Even though they weren't as smooth as I was hoping for they were a big hit at the shower and probably an even bigger hit with the guys. We had no problem finishing off the leftovers! I will probably try making them again at some point (they were seriously really tasty and
slightly addictive). I will not make them again unless we're having people over though. This is probably the unhealthiest dessert I've made in...well, a long time. It's no big deal if you only have 1 or 2, but they definitely aren't very nutritious.
Good luck if you try making them, and even if they're ugly they'll still be yummy : ) I'd love to hear any tips you have on making the candy shell smoother and/or how you get the cake pops to stay on their stick while you dip them!



 (
( (
(


