30 March 2011

Nothing is safe...

Now that I figured out I can sew well enough to make socktopi and straightener covers nothing in our house is safe. We had a pile of things to take to Goodwill. But now we have a pile of things to take to Goodwill and a pile of things we don't want, but I think I might be able to use in some sort of sewing project down the road. I even saved two things from the bags I left out yesterday for some kind of charity truck to pick up (can't remember which charity now...hope it was a good cause!).

Not sure whether I should be excited about this new trend or feel bad that I'm not giving as much away. I think I would be more excited if the "storage spot" for this new Goodwill-turned-sewing project pile wasn't literally just a pile beside my dresser. It doesn't really give off a neat and tidy vibe. A random pile of clothes on the floor not looking tidy - shocking, I know!

Hubs suggested I prioritize the projects I want to tackle. Wow that's a great idea! Aaaand not as much fun as starting five different things basically all at once because I got excited. It seems like husbands are good at giving practical (although occasionally unsolicited) advice. Maybe I'll make a list today after I start a new purse.

In other news, I won a giveaway!! If you've never won one, don't lose heart. It's bound to happen eventually. And it is SO exciting when you win!!! A big thanks to Organize and Decorate Everything for hosting and to The Country Chic Cottage on Etsy for the goods! Here's what I picked out.
I can't wait to use the fabric for something! I guess I should get on with making that to-do list so I can figure out what to make. Feel free to send any brilliant ideas my way, I have about a yard of the fabric.
post signature

28 March 2011

Quick Shirt Redo

So I had this shirt.
I wasn't loving the ruffly sleeves.
And it was a bit too wide.
So I cut off the sleeves and took it in. And then I cleaned the mirror. I was going to blame the bad pictures on the fact that it's a really old mirror and has some spots, but I didn't think I could pass off fingerprints as "age spots."
Ah, much better! The shirt, I mean. I guess that's about as good as the mirror gets. (And do I always look that white? I'm going to have to blame that on the mirror/lighting as well.)
My sewing machine didn't totally freak out this time when I tried to sew a knit fabric (yay!). I just took it pretty slow. What can you save from your Goodwill pile??
post signature

23 March 2011

Zipper Pocket Tutorial

Do not be afraid! Ok, you can be a little afraid. Just don't be so afraid that you skip an awesome project because it has a zipper. Being that I'm basically a zipper expert now (this tutorial makes 2 zippers that I've ever "installed" hah!) I thought I'd share how I make zipper pockets. I've seen a couple different tutorials on this, but unfortunately some of them left out minor details like whether you'll be pinning things right sides together or whatever. Hopefully I didn't make any big oopsies in writing this!

My pocket is going to be pretty small, so my zipper is too long. There are instructions on the zipper for how to shorten it, but I'll list them here just in case.

Figure out where you want your zipper to end.
Whip stitch across the zipper using doubled over thread. Here's what they mean...Come up through the top of the zipper, then back down on the other side.

Then up on the first side, and so on and so on. Do this 8-10 times or just a lot if you lose count after 3. Tie off your thread.
Cut the zipper about 1/2" below where you stitched. Hopefully you can see the little stitched section on the picture below.
Do the same type of stitch on the other end of the zipper, but only a few times just so you don't have crazy ends sticking out while you're trying to sew. (Sorry, no picture for that step)

I apologize for the lighting being crazy in the next pictures. I kept going back and forth between two rooms (sewing machine and ironing board) and one had sun coming in and the other didn't.

Cut fabric for the pocket that is twice as long as you want your pocket and at least an inch wider than your zipper. My zipper was 4 1/2 inches and I cut my fabric 6 inches wide. Fabric was 7 inches long, which means my pocket will be 3 1/2" x 6" finished. Make sense? (I hope!)
Fold your fabric in half hamburger style and lightly press the fold so you can see where the center line is.
I interfaced around where the zipper will be. I've done a zipper without this step, but my fabric is pretty thin and it helps prevent stretching or tearing.
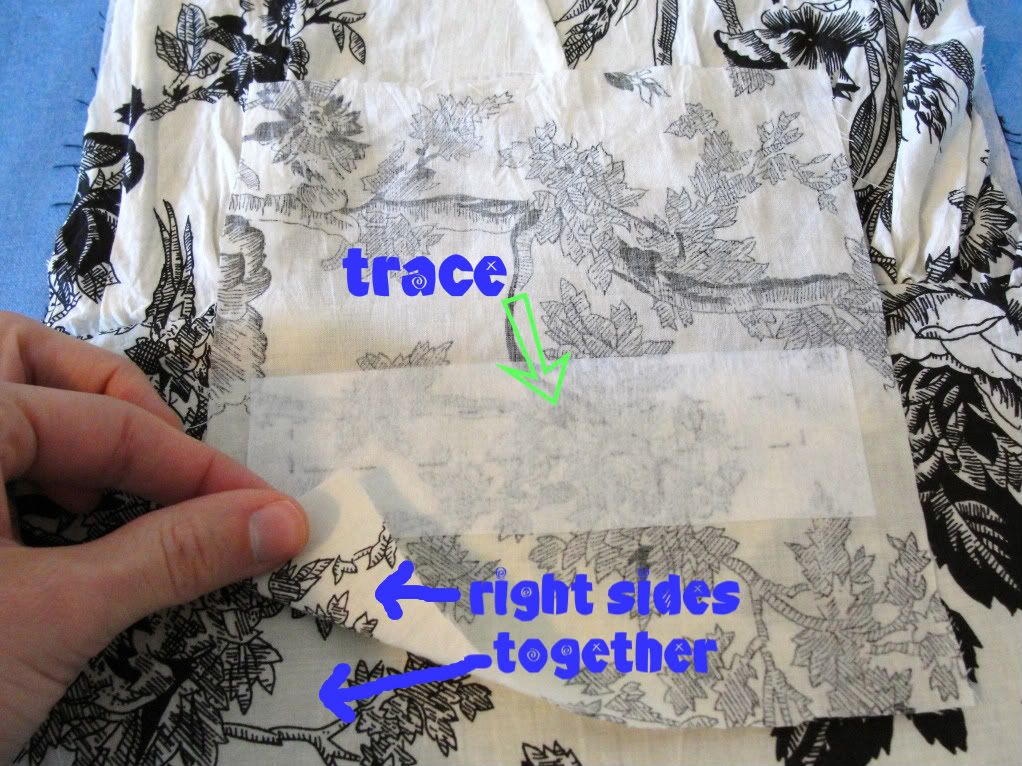
About 1/2" below the center line, draw a rectangle. Rectangle will be 1/2" high and as long as you want the zipper to be. This will be the hole your zipper goes in so make sure it is long enough to contain the USABLE section of zipper (do not add length for the tabs at either end of the zipper stops).
Pin your pocket piece to the other fabric (in this case, purse lining) RIGHT sides together. Remember, the rectangle you traced will be the zipper hole, so position the rectangle where you want the pocket to be.
Sew around the rectangle you just traced.
Cut down the center of the rectangle you just sewed. Stop about 1/4" from each end and make a diagonal cut toward each corner. Just make sure you don't accidentally snip the seam! You will be cutting through the pocket piece and the other fabric.

Next you stuff the pocket fabric through the hole you just made. This will likely make it look like you messed up. Not to worry, things look a lot better after you press them.
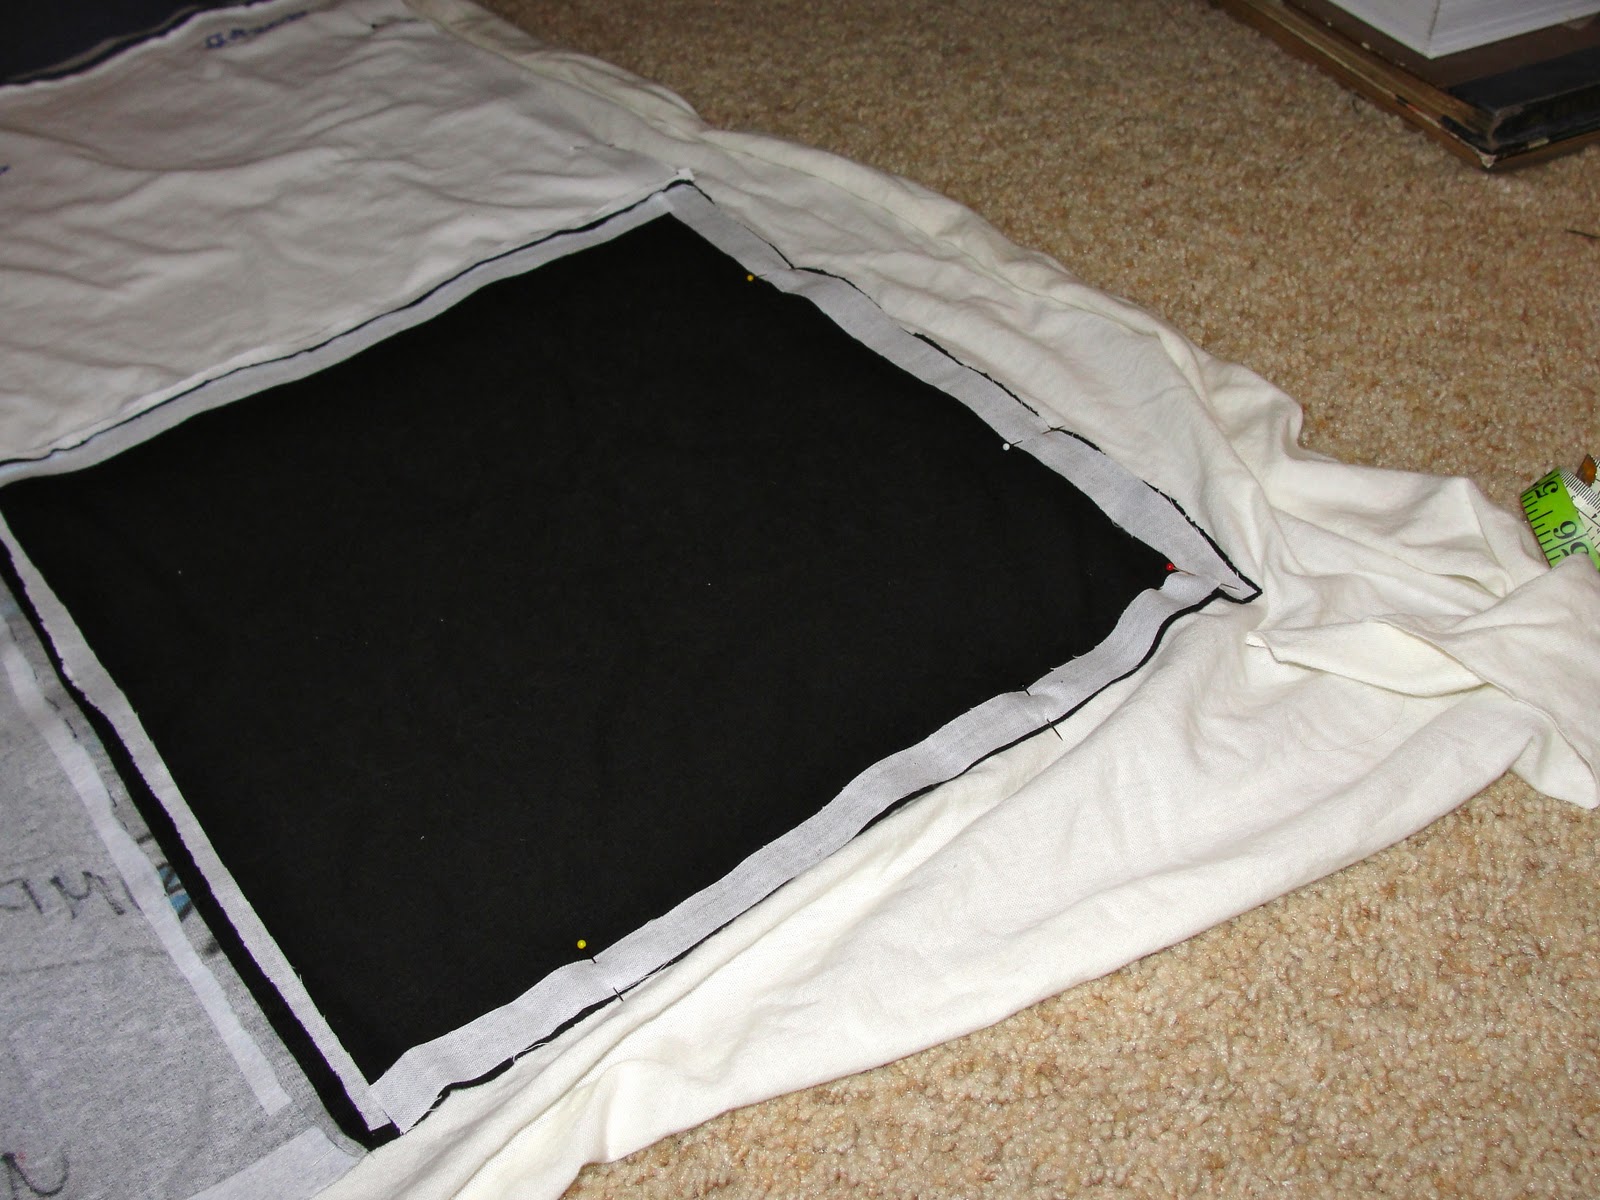
Press the pocket fabric so that everything lays (mostly) flat. The picture above shows everything pressed, the pocket is laying open and you see the back (wrong) side of the purse lining.
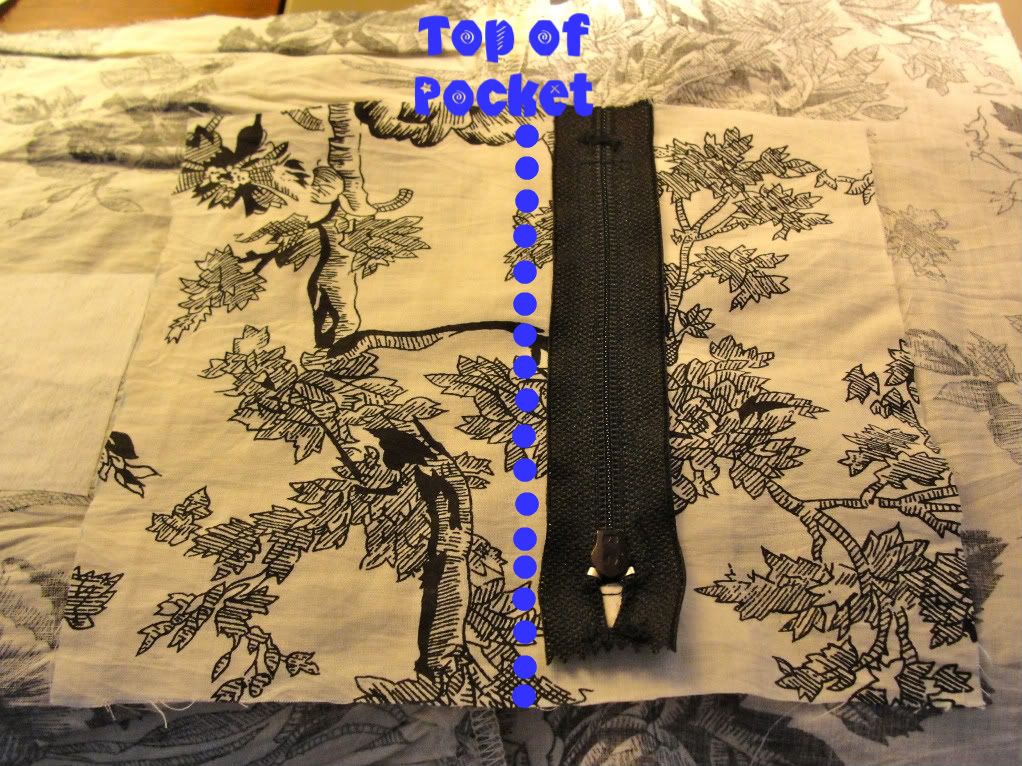
Position your zipper in the hole. So the order (starting at the table) is zipper, pocket, purse lining. The purse lining should be right side facing you. This should look how you want it to look inside the purse. Now I pretty regularly skip things because I'm lazy to save time, but you don't want to skip pinning the zipper in the hole. The zipper will move and things will go downhill very quickly if you aren't prepared (pinned). I've yet to figure out a good way to position the zipper and pins so that I don't have to remove pins as I'm sewing, so if you figure it out yay for you!
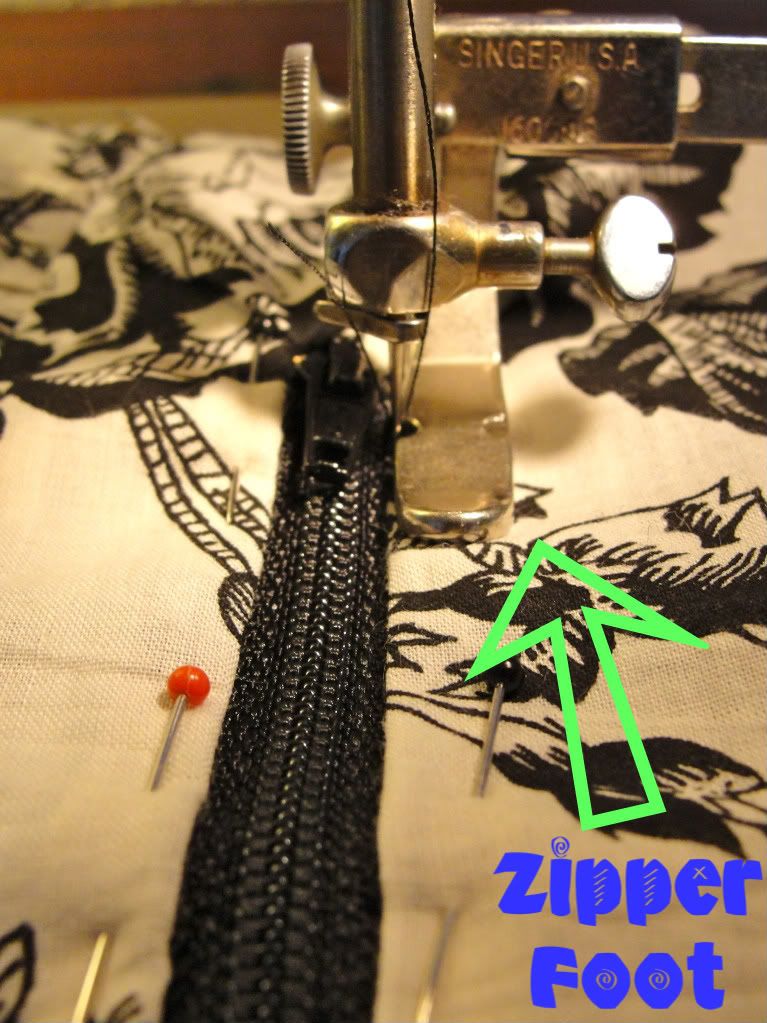
You'll need to use a zipper foot on your sewing machine for this part. I didn't know what a zipper foot looked like, so maybe the picture can help you find it. Basically the needle goes on one side of the foot instead of through the middle so you can get really close to the zipper. Sew very close to the edge of the fabric. (If you don't have a zipper foot, you might want to do a test run and see how close you can get to the edge. You may still be able to sew around the zipper without the zipper foot, but I haven't tried.)
Ta-da! Zipper is in! Now that wasn't so bad, was it? If this is your first time you might be saying, "Uh, yeah that was bad." But hopefully your zipper is at least attached in a semi-presentable manner and you'll probably breeze through your next zipper so easily you'll be convinced you're qualified to write a tutorial on it to correct all of the confusing things about my tutorial! And here's how things should be looking on the back now that the zipper is sewn in.
Time to sew the pocket up.
Sew along all three open edges of the pocket. Right sides of the pocket should be together. Be careful when you sew up the sides, you don't want to get any extra fabric in there. You can see I have the lining fabric folded back in the picture.

And now the finished product...

Back side - this will be hidden when the lining is put in the purse.
Are you as wiped out as I am after that? Hopefully not. I actually had a much easier time with the zipper my second time around. It's the tutorial writing that's hard for me. Totally worth it though because I'd hate for someone to feel totally lost (or worse, skip a project altogether) because of a zipper. That and it will help me remember next time too...I had to look almost everything up all over again this time around.

I've seen other variations to add a zipper pocket, so this is by no means the only way you can do it. If you have any questions or notice a hideous mistake PLEASE comment or email me and I'll try to clear it up. I'm still pretty new to everything sewing, zipper, and blog related coming up with tutorials, so I'd love feedback on how to make tutorials better in the future.
post signature

21 March 2011

Thank you, Thank you

Happy Monday everybody (writing this on Sunday, which may account for the cheery attitude)! Emily over at Sweet Bella Roos recently passed the Stylish Blogger Award to me. Thank you! I went to high school with Emily and she posts lots of yummy recipes. I can't wait to try the s'mores pie she made recently! So now I'd like to pass the award along to a couple other ladies.

Brittany at Every Day Life of an Air Force Wife just started her blog and I've been able to relate to every post! I'd love for you to go over and show her some bloggy love.

I recently started following Kitty at A Law Student's Journey. She's always coming up with great crafty ideas. I especially like her many uses for tshirts and her tea party lamp!

Getting this award also means I share seven things about myself, so here goes (I'll try not to bore you to death!).
  1. Hubs says I'm narcoleptic. I'm not really, but I do fall asleep amazingly fast when the sleepy feeling hits! I usually only see about half of the movie when we watch at home. 
  2. In college, our volleyball team won the national championship three years in a row! Now before you start looking me up on wikipedia, I went to a really small school so the national tournament wasn't like March Madness or anything (or even remotely close). It's still fun to be able to say that I was a national champion though and I have so many good memories from playing volleyball in college. 
  3. I was shocked when my husband first mentioned joining the military, but now I couldn't be more proud of him. Sometimes military life still shocks me, but we've been really blessed so far and we're really enjoying California right now. (I guess that was kind of about Hubs not me, but I can't help it that he's so awesome I'm compelled to brag at any opportunity) ; )
  4. I kind of hate running, but I also have been toying around with the idea of doing a half marathon. Yes, I'm crazy. I've been running a little more lately, so we'll see how it plays out. I know I'd be excited to say that I finished a half marathon, but the training is rather daunting!
  5. Whew, I'm running out of steam here. I have a hard time writing about myself (if you couldn't tell by reading my less than stellar "About Me" section). So to make this into one of my seven things, I'll add that sometimes things sound way funnier in my head than they do on the computer screen. Hubs thinks my writing is becoming more entertaining, so hopefully people will stick with me long enough for me to get good at this whole blogging thing!
  6. I LOVE dried mangoes. Seriously, this might be bordering on an addiction. It's fruit though and it's unsweetened so it's good for me, right? : ) Other Trader Joe's foods that I'm love with - Baked Jalapeno Cheese Crunchies, Mandarin Ginger Chicken (something like that, it's in an orange package in the frozen section), and slightly undercooked sourdough baguettes. I could really go on and on about TJ's, and if you don't live near one I'm very sorry (and I'm almost heartbroken to say I'll be joining you next year when we move)!
  7. I'm the queen of indecisiveness...or am I? Yes, yes I am maybe. See what I mean? Picking paint - nightmare. Picking fabric - fun for me until I start stressing that I might not pick the *best* one, nightmare for Hubs if he happens to be with me because I take for.ev.er. Deciding whether to buy the thing at Target that I don't really need but it's awesome and they basically read my mind to find out that I would instantly love it - totally draining.
Well there you have it. Seven things about me. I hope you'll go visit the other ladies I mentioned. Now I'm off to run, ugh train for a half marathon, yay!
post signature

18 March 2011

Enough with the Tshirt Quilt Already!

Another post about the tshirt quilt yay! Don't worry, I promise this is the last one because I'm finished!! Excited would be an understatement. This is by far the biggest sewing project (I guess it's technically quilting, but I rarely do anything technically correct so we're going to stick with sewing) I've ever worked on. And I even finished in a reasonable amount of time!

So I'm going to run through the last steps to finish the quilt then I'll post these on the tutorials page and you'll never have to read about my quilt quest again. : )

I think I mentioned before that the back for my quilt came from a king size set of jersey knit sheets on clearance at Target. I wanted the fabric on the back to be similar to tshirt fabric, so this was perfect. And my Beverly's doesn't carry jersey knit fabric on bolts (meaning there's a pile of random fabric and I would've been in luck only if I wanted fabric with apples on it or purple with glitter stripes but not so much otherwise). I laid out the flat sheet over the tshirts and (after much positioning and repositioning) cut it down to size.
Enough leftover for a dress?? Maybe?....ok, no.
Don't be too jealous of the froggy slippers I got for Christmas : )
I'm not sure if you have much experience with jersey sheets but they tend to stretch out kinda weird after you wash them, so I left 4-6 inches excess on two sides when I cut just in case. And it's a good thing because that's not exactly a "straight" line.

Next I cut the batting down to size. A little side story about the batting (or bantam according to my husband, I have no idea where he got that!?). I found some Warm and Natural batting for a full size quilt online at Walmart for $8! I had that in my shopping cart faster than you can say, "Warm and Natural for less than half price." I had it shipped to our "local" (10 miles away if you can believe that) store and it finally came in this week. I went to pick it up and they brought out a small box...a box wayyy too small to contain any batting. Then I picked the box up and it weighed less than a pound - not good. Too bad the guy "helping" me had no clue what batting was and was trying to tell me that this was my order (a Cuttlebug stamp was inside, which is nothing at all like batting). Long story short, or at this point just slightly less long (sorry), I returned it and bought some cheapo batting at Walmart.
The batting was much easier to cut than the sheet since it wasn't stretchy.
I had some trimming up to do - originally I was thinking maybe I would have like 2 inches of the backing show around the edge on the front of the quilt, but my sewing/calculating skills wouldn't allow for that. : ) 
 
Next you're going to lay everything out and pin it down. I did this the hard way, so maybe I can save you some trouble. I had the tshirts on the bottom to help line everything up, but I ended up re-pinning everything so the tshirts were on top and I could see the edge more clearly when I was sewing. The tshirts and the back material will be RIGHT sides together, then the batting goes on top.
Sew around the edges. I had a 1/2 inch seam allowance because I knew there were a couple spots where the batting wasn't quite as wide (probably due to my ultra precise cutting method). I left one square open for turning.

Clip corners and press seams (ugh). As I'm writing this (and still haven't pressed the seams) I'm debating on whether to just tie the quilt by hand at the corners of the tshirts or go ahead and stitch all the way down each row and column. I ended up not exactly pressing all of the seams...do you have any idea how hard it is to press seams that involve batting? You may have better luck if you trim the batting really close to the seam after you sew everything together (but mine turned out fine and I skimped on the pressing and didn't trim).
So turn everything right side out. Now you quilt it or tie it...or whatever the correct term may be. I decided to hand tie the quilt at all of the tshirt intersections because I didn't want lines going all over the back. I did probably around 6 stitches at each intersection and used thread that blends into the backing so it isn't very noticeable.
Karen at Sew Many Ways has a great blind hem tutorial that I used to close up the hole I left for turning. And then......I was done!!!! I tried to get some pictures of how cozy I am in my blanket, but I didn't have much luck.
I take no responsibility for the painting on that wall. It is my husband's and despite my many attempts to hide it, it's still hanging prominently in the living room.
You'll just have to take my word for it, I'm cozy! So there you have it. I promise, no more quilt posts because I don't have the patience to make another one for a very long time! Thanks for reading and enjoy your weekend!
post signature

16 March 2011

The day the firetruck hit my car

The day the firetruck hit my car was today. Yes, that's right. A firetruck hit my car. Now don't get too worried because technically the cars were parked and by "hit" I mean got an oversized door ding.  But "The day the door of the firetruck accidentally dinged my car door" is way less catchy. 

I felt bad for the guy because I could tell he was embarrassed and felt bad about the whole thing. I'm still not totally sure what was going on because I've never been in an accident before so I don't really know what's supposed to happen. Hopefully it won't be too hard to get it fixed.

I am a little worried about the elderly couple next door though. That's why the firetruck came originally, and I'm not sure what happened but I never saw an ambulance or anything. For the door ding, however we managed to assemble the firetruck, fire SUV, and two police cars. Hopefully the other neighbors don't think we have anything crazy going on over here!
post signature

15 March 2011

San Francisco

Well this post has nothing crafty about it. I just wanted to give myself you a break from the tshirt quilt play-by-play. We went to San Fran a few weeks ago and had a great time! Hubs had a long weekend (I didn't, oh well) so we stayed Saturday and part of Sunday.

The drive there was pretty uneventful, but Hubs really needed to find a bathroom by the time we got there. Unfortunately for him some streets were down to one lane to set up for a parade and lots of parking was blocked off. Traffic was going nowhere so we decided to pull over and he would find a bathroom. We kind of pulled into a spot with a sign that said no parking that day because of the parade. We thought, no problem, he's just going to run in and run out and we'll be on our way.

So I'm chillin in the passenger seat and it is taking kind of a long time, but whatever. Next thing I know there's a police car behind me. Uh-oh. And then he honks. And then I start scrambling to climb over into the driver's seat. And then he honks and turns on his lights. Eek! I finally got back into the flow of traffic and he turned his lights off and stopped honking. Whew!

So now I'm driving, Hubs is in a bathroom somewhere and I don't even remember what intersection I left him at. I call him and he didn't answer (of course). I kept heading toward the hotel because I had no clue how to get back to where I was, thank you one way streets. And it's raining (this part is really worse for Hubs since the umbrella is in the car). Am I the only person that gets really flustered when I don't know where I'm going? Because I was.

Turned out none of the places near where we pulled over had a bathroom (including one restaurant...how can you have a restaurant with no bathroom??). So he ended up walking to a nearby hotel. I finally got turned around and picked him up on the side of the road. The rest of the trip was quite pleasant though. : )

We were planning on going to Alcatraz since we parked illegally haven't done that yet, but it was sold out. Guess I should've planned ahead on that one. We ended up touring an old submarine instead, which was really cool. And made me never want to live on a sub.
36 people to a room and no shower. No thank you. By the way, it was cold and raining - I don't just wear bright yellow rain boots all the time. We also saw the parade of giant plaster heads Chinese New Year parade.
Toured the Japanese gardens, loved this bridge!
Walked around Golden Gate park. Is this not the coolest tree you've ever seen? Ok, maybe not coolest ever but we really liked it.
And went up to Twin Peaks. If you go to San Francisco, you have to drive up here. The view was amazing! But bring a jacket...and probably a scarf...and maybe a hat and gloves. It's windy!
I'd shoot for a clear day though since San Fran can get rather foggy.
So that's it in a nutshell. And can you believe we walked everywhere, as in once we parked the car we left it until we came home and didn't even take a bus or a cab? Yeah our tootsies were tired! The bus routes were a little off because of the parade so we ended up just walking. Hope everyone's having a good week so far!
post signature